Copper Shielding Braid and ESD Protection
In my previous blog on electrostatic discharge (ESD), “Don’t Let ESD Give You a Shocking Experience!”, I described how, as a junior engineer, I was schooled in the dangers of this phenomenon. Unfortunately, based, in part, on an optimistically mistaken belief that the creators of modern electronic components had taken steps to protect them from ESD, I began to drop my guard.
Sad to relay, I was taught the error of my ways in no uncertain terms when a blighting bolt of exhilarating ESD wrought havoc on my “Phantasmagorical and Pedagogical Prognostication Engine” (don’t ask) hobby project. Following this disaster, I quickly updated my personal antistatic protocols and precautions.
Amongst other things, I purchased a large, dissipative grounding mat like the 6672436 from ACL Staticide. I also purchased a number of antistatic wrist straps with associated cords, like the ECWS61M-1 combo from SCS, along with an equal number of ground plug adaptors, like the 09838 units from Desco.
As I also noted in my earlier column, you can have all the antistatic pads, straps, and ground plug adapters in the world, but they won’t do you any good if they aren’t grounded properly. This is something else I discovered the hard way because although the LED on your power strip may provide a comforting glow, you never know when the wall socket itself is faulty. Thus, I strongly recommend splashing the cash for a power receptacle tester, like the RT210 from Klein Tools.
With regard to the Prognostication Engine, when it came time to wire up the toggle switches, pushbutton switches, potentiometers, and LEDs in the lower cabinet, prior to my exciting ESD surprise, I would have probably used individual pieces of regular 22 AWG stranded hook-up wire. Following my ESD incident, as an older and wiser man, I opted to use a four-conductor shielded cable, like the 8723 060100 22 AWG cable offering from Belden (Figure 1).
 Figure 1: All of the wiring in the Prognostication Engine’s lower cabinet involves multi-core shielded cables. (Image source: Max Maxfield)
One result of this was that a wiring task I’d expected to take a couple of hours ended up consuming days of my time. If you look at the lower left-hand side of Figure 1, for example, you can see that this involves multiple sections of shielded cable, each approximately 1 inch long. I’m sure an experienced technician could have made short work of this.
On the bright side, if anyone should query my antistatic stance in the future, all I will have to do is stick their head in the back of my Prognostication Engine to reassure them that I’m taking no chances.
But wait, there’s more. I also invested in a roll of sticky-backed copper tape like 3M’s 1181 X 1" offering. While sporting one of my spiffy new antistatic wrist straps, I wrapped this tape around the power wires to the microcontroller development board and around the power and signal wires to the meter case. In both instances, I added wires connecting the copper foil to ground (Figure 2).
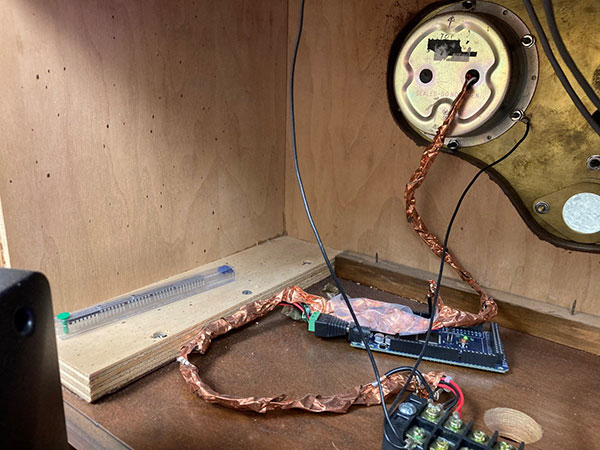 Figure 2: The power and signal wires to the microcontroller board in the Prognostication Engine’s upper cabinet, and from the board to the meter case, are now wrapped in conducting copper tape, which itself is connected to ground. (Image source: Max Maxfield)
There are several advantages to using copper foil tape in this way, not the least of which being that it can be applied to existing wiring harnesses without having to disconnect everything. Unfortunately, although I’m sure that an experienced technician could have applied this copper foil tape in such a way as to bring a tear of joy to the beholder’s eye, my attempt ended up looking a bit like a “dog’s dinner,” as they say.
Copper shielding braid to the rescue
I was chatting about this problem with a friend named Rick Curl, who informed me that another solution I might consider was copper shielding braid. As fate would have it, at that time, Rick (who is now retired) was working for a company that created test equipment for use with power transmission lines carrying hundreds of thousands of volts. It turned out that his company purchased a certain form of RG/8 coaxial cable that was sheathed in this braid, but they only required the inner conductors, so they removed the braid and—believe it or not—they threw it away. Thus, a few days later, Rick visited my office and gifted me with enough braid to last me the rest of my life. You can see me proudly holding my new ESD killer in Figure 3.
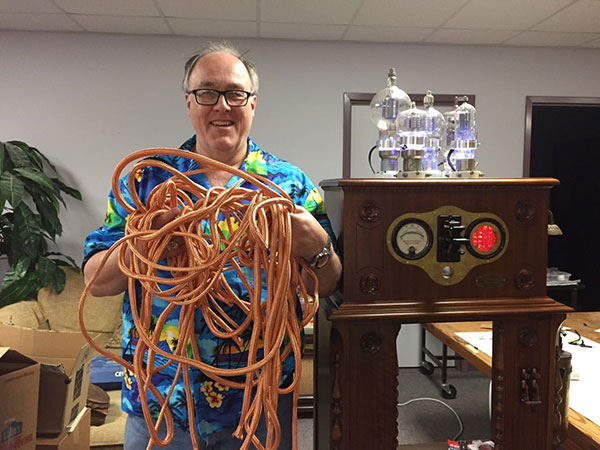 Figure 3: Very excited about getting a lifetime supply of copper shielding braid. Not only is it an ESD killer, it is also very desirable for RF grounding purposes because of the skin effect. (Image source: Max Maxfield)
The neat thing about copper shielding braid is that in addition to protecting against ESD, it is also very useful for RF grounding purposes. This is because of the skin effect, where at higher frequencies, the current tends to flow on the surface of the conductor instead of traveling through the entire area. The braid has much more surface area than a solid (or even stranded) wire of the same gauge.
So, armed with my newfound braid, I immediately set to protecting all of my main power (5 volts) and signal wires. The great thing is that once you’ve inserted the wires through the braid, you can pull the ends of the braid to reduce its diameter so that it tightly hugs the cables it’s protecting (Figure 4).
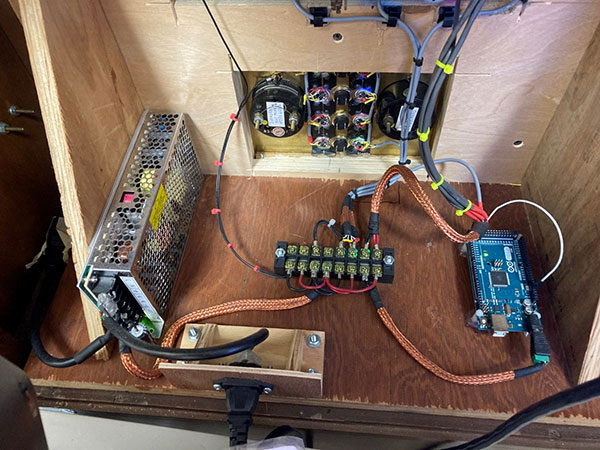 Figure 4: In addition to being extremely effective against ESD, copper shielding braid can be pulled to fit tidily around the cables it is protecting, resulting in an aesthetically pleasing presentation. (Image source: Max Maxfield)
If you look closely, you can see that I soldered short pieces of wire onto one end of each piece of braid to make connections to ground. Also, I employed short pieces of heat shrink at both ends of each piece of the braid to prevent them from fraying.
Happily, for those who don’t have a source for reclaimed copper shielding braid, this awesome product is available for purchase in a variety of diameters, such as the MBC0.50CP25 0.5-inch diameter tubular ground braid from Techflex.
Conclusion
When I’m talking to junior engineers who are just starting in their careers, one of the pieces of advice I give, along with suggesting they pay attention and learn from others’ mistakes, is to try to always have a hobby project on the go. In addition to providing a way to relax by thinking of something other than work, speaking for myself, working on my hobby projects invariably causes me to learn all sorts of useful things. In the case of my Prognostication Engine, I learned more about ESD than I ever wanted to know, but I was also introduced to a variety of tools, materials, and techniques that will serve me well in the future.

Have questions or comments? Continue the conversation on TechForum, DigiKey's online community and technical resource.
Visit TechForum


